
|
|
4QD-TEC
|
|
Before trying to understand a full bridge circuit, you may care to read up on PWM controllers, which page also describes how a half-bridge circuit works. Most full bridge motor controllers also use pwm! Designing a full-bridge PWM circuit that is reliable and 'user-proof' is actually quite difficult! 4QD released our first such controller in 1992: it was probably not the first but was certainly early in the race.
This page describes the switching scheme used in that controller. There are many different ways of switching the bridge legs to accomplish the same effect!
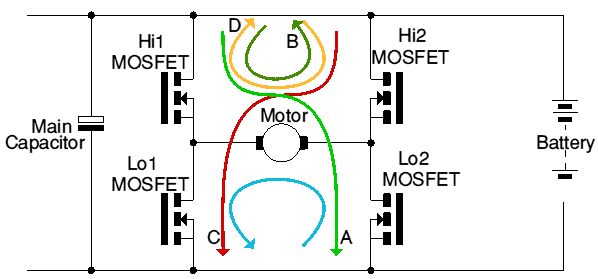
The circuit shows a full bridge of four MOSFETs. In forward drive, current must flow in the direction of the pale green arrow A from battery positive, through Hi1, through the motor and so through Lo2 to battery negative. In reverse drive, current must flow in the direction of the red arrow C. With the current state of ICs and N channel MOSFETs, only a fool or a masochist would use the hi-side as the main active switching element, so it is normal to apply PWM to the loside MOSFETs, and to let the Hi-side ones take a more passive role.
So, for forward drive, Hi 1 would be permanently on, Hi2 off, Lo1 off and Lo2 on, maybe chopped in PWM mode. If PWM is used, then, when Lo2 is off, motor current will still need to keep flowing in the same direction, forced to do so by the motor's inductance, and it will use Hi2 as a 'flywheel' diode as shown by the dark green arrow B. It matters not a lot whether the hiside MOSFET is turned on during the flywheel period: if it is on, then resistive losses apply rather than the diode drop that would cause more rather more loss.
Reverse drive then is similar, with Hi2 permanently on, Lo1 chopping and Hi 1 flywheeling. Red (C) and orange (D) arrows apply.
Note that you will need to use a static, pumped supply for the hi-side gate drives. A Bootstrap type charge pump won't work unless the output is switching and, at full motor speed, nothing in the bridge is switching, so the bootstrap will fail.
The rest of the design rather depends on how 'safe' you want to make the circuit. A proper commercial controller needs to survive almost anything a user can do to it, and requires proper protection in all four quadrants. So it needs current limiting on both halves of the bridge, not only in drive mode but also in regen mode. This of course adds significantly to the complexity!
So - what about regenerative braking? Given the facts that you will probably want to PWM switch the lo-side transistors and that current monitoring is easiest done in the loside MOSFETs, consider forward regen braking. Forward drive current is the green arrow, A. So during forward braking the current is reversed with respect to this. In forward drive, the left hand end of the motor is positive (it was connected to battery + by a turned-on Hi1). In forward braking, the motor's back emf is of the same polarity as for forward drive (as the motor is rotating in the same direction), but the current must be reversed (blue arrow). So the left end of the motor will still be positive. So we must permanently turn on Lo2, shorting the RH side of the motor to battery negative and we must chop Lo1 on and off with the PWM signal. That way Lo1 is still working with positive voltages and currents, making it easier to think about and easier to use for current sensing and current limiting. If Lo 1 is chopping then, when it is off, motor inductive energy will still cause current to flow and it will want to flywheel through Hi1 (remember, Lo2 is on full-time) back into the battery, giving the regeneration (reverse of current arrow A).
For the reverse direction, when braking we need to turn Lo1 on full-time and chop Lo2.
There are of course other schemes possible, but they either involve chopping the hi-sides, or sensing negative currents. Or you could put a resistor in the motor and use a floating differential op-amp to sense motor current. Rather you that I! A resistor to sense currents of maybe several hundred amps is neither a common nor a small item and is therefore of significant cost! And it has to be incorporated neatly into the controller's design.
You may also realise from the above that, provided you don't get the timing totally wrong, so that Hi 1 and Lo 1 (or Hi2 and Lo2 for that matter) are on at the same time, it matters not a lot what you chop and what you don't - the flywheel current will always find somewhere safe to re-circulate!
Of course the scheme proposed here does require that you sense when the motor back emf is greater than the required speed, i.e. when the motor should start regenerating, and change the state of the bridge to do that. Other schemes are possible, but they (probably) all involve active hi-side switching if you require regenerative braking. So this scheme is the method we used in our first full-bridge controller, the 4QD series. Although it is now an old design, it is still very successful and very reliable - if a little complicated! Simpler designs require a little more lateral thought, combined with chopped hi-sides and a certain amount of cunning in arranging the regenerative current limits!
I would also add than, on the next full-bridge circuit we design, it is unlikely that we will use this same scheme! We do from time-to-time work with freelance engineers so if you have a mind to design a controller that we could use, maybe you should contact us?
| 4QD Sites: |